Sunday, December 28, 2014

Joy

Christmas has come and gone with the new year fast approaching.  We had a wonderful holiday and are enjoying this time off from work.  I was so happy to receive some new dies and stamps as gifts and can't wait to use them.

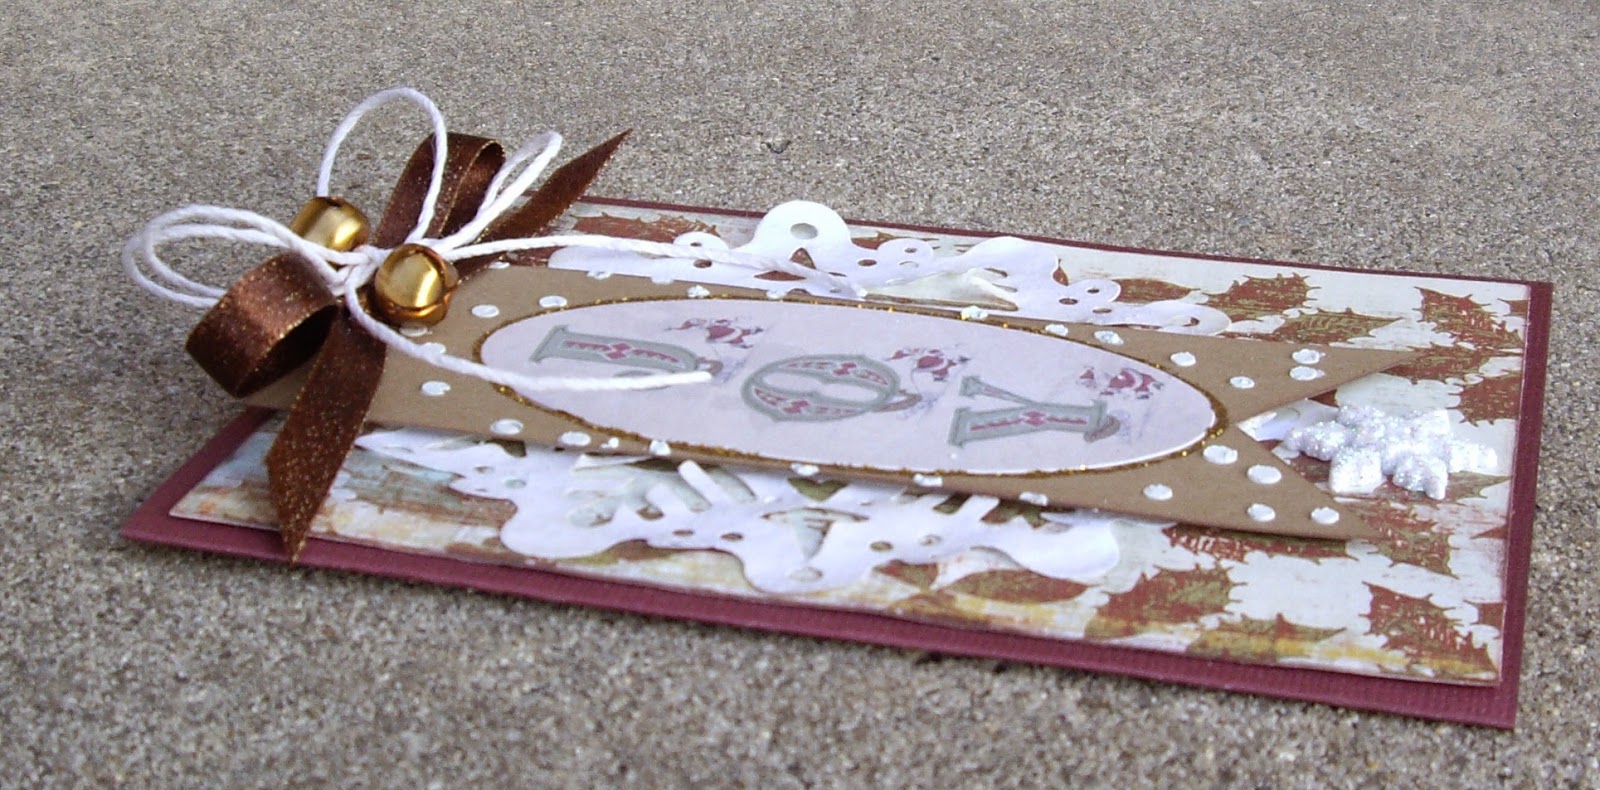
Today, I have a couple more Christmas-theme cards to share.  Both have the Joy sentiment but are totally different.  If you click on each photo, you can see the details better.


Once again, I have used my favorite holiday paper collection from My Mind's Eye.  It is several years old but I love it.  The paper already has some glittered accents on it, so I simply added a few snowflake stickers from Martha Stewart.  The Tim Holtz reindeer diecut was given a coat of Recollections glitter.  The pennant was covered with a piece of lacy ribbon and accented with a Recollections snowflake and flowers.  One of the die sets I received were the beautiful skeleton leaves from Prima.  I gave two of them a coating of Martha Stewart glitter and tucked them into the flowers.  The word "joy" was made from a Tim Holtz die (another gift!) and coated with the same glitter as the leaves.

Not stopping there, I decided to use my Tim Holtz matchbox die and create a box to go with the card.


I decorated the inside with an added surprise.  The pine branch on the box lid was made with a McGill punch.


The next Joy card again used the MME paper as a background.  The snowflake doily is from Recollections.  I placed a Melissa Frances sticker onto a kraft banner, highlighted it in Gold Stickles, and used a stencil and modeling paste for the dots.  A hemp and ribbon bow, bells and Recollections snowflake add the finishing touches.


The last few days before Christmas was a papercrafting frenzy for me.  I really need to learn from that and start creating my holiday cards/tags much sooner!  Let me take the time now to wish you a very happy and healthy new year.  I do appreciate each and everyone who stops by here and for the sweet comments you leave.  See you in the new year!

Sunday, December 21, 2014

Christmas Crafting

With the big day almost here, I have been feverishly trying to make enough Christmas cards and tags to give out.  I have a good amount done but far less that I wanted to have.  I never seem to allow enough time!  Today, I have a card and some tags I made for my co-workers to share.

Recently, I received a collection of Martha Stewart 6x6 Christmas papers, tags, and stickers from my Secret Santa partner in a swap group I joined; so I immediately went to work using everything for this card and the tags.  It's amazing how much time is saved by using 3-D stickers!  It was a godsend for me at this late date!


Aren't those little ornament stickers the cutest things?  I simply added the baker's twine to the top of each and attached them to the Martha Stewart paper.  The border at the top and the chipboard tag are an older line from K&Co, and the tinsel trim is Tim Holtz.

Next up are a trio of tags.  Love those snowglobe stickers.  To highlight each globe, I used a couple of circular punches from EK.  These were so easy to put together using Martha's pre-made tags.


For this one, I added some crochet trim to the bottom, a metal snowflake, Stickles, a K&Co layered flower sticker, and Martha Stewart rhinestones and snowflake stickers.


On this tag, I added a couple of Recollections dimensional pinecones on top of the pinecones already printed on the tag.  I also added more Martha Stewart rhinestones on top of the berries on the holly leaves.  Love the Christmas lights strand from Jolee's that I wrapped around the globe.  Red bows and a felt greeting finished it off.


I think this last tag is my favorite of the group.  The snowflake stickers are from Jolee's and Martha Stewart.  I tucked a bit of eyelash yarn under the globe.


These tags and the card were all done in one afternoon--quite an accomplishment for me.  I usually like to spend more time on what I make but I needed to get them done quickly.  I do have more to share but will save that for another time.

Thank you so much for taking the time to stop by and for the sweet comments you leave.  I would like to wish everyone the happiest of Christmases.  Take time to enjoy each moment.

Sunday, December 14, 2014

Christmas Tags 2014

Hi friends!  It's getting much closer to the holidays now and I'm trying to finish my craft projects for Christmas.  I just got back from a short visit to Cape May, NJ, to see their annual Victorian Christmas celebration.  I picked up some darling ornaments to add to our tree.  We stay at a lovely bed and breakfast called "The Gingerbread House"--how appropriate for this time of year!

Anyway, today I have a couple of Christmas tags I made for a recent swap.  We had to make five for the exchange, so here are a couple I made.


This first one started with a kraft tag base inked with Ingvild Bolme white chalk ink.  A layer of red Christmas paper came next.  The Melissa Frances sticker was placed on a piece of corrugated cardboard that was given a coat of Golden's Pear Mica Flake and then adhered to the tag.  The pine branches were made with a McGill punch.  A bit of lace, hemp, vintage button and seam binding finished it off.


My next tag came together very quickly.  I started with a kraft tag base layered with a piece of Christmas paper from My Mind's Eye that I've had for years (I absolutely love that stack!).  I purchased two packs of holiday stickers from Jolee's and combined them on this tag.  See the little pinecones, star and ornament hanging from the bows in the background?  They are stickers also.  A piece of burlap ribbon was tied to the top.  Very easy!


Well, that's it for today.  I need to get back to some cardmaking if I expect to have enough done for Christmas!  I'll have a couple more of the tags to share next.  Thank you so much for stopping by and the very sweet comments you leave.  I appreciate you!

Sunday, December 7, 2014

Winter Wonderland

Today, I have an incredibly quick and easy card to share for those who may not have a lot of time to create more detailed ones for the holidays.


This beautifully detailed snowflake was made with a Hero Arts stamp and  heat embossed with Recollections Sparkle Embossing Powder onto blue cardstock.  I added a few clear rhinestones here and there on the snowflake for added sparkle.  A glittered silver ribbon was tied to the side.  I think I may whip up a few more with some slight variations.

Just a short post today as I am trying to use my spare time to meet my handmade crafting goals for the holidays!  Is there ever enough time?  I wish you a wonderful week ahead and thank you for taking the time to stop by.  I appreciate your sweet comments.  I have some Christmas tags to share in my next post.

Sunday, November 30, 2014

Stamping with My Besties

Hi friends!  For those that celebrated Thanksgiving this week, have you had your fill of turkey yet?  This year, I started my Christmas shopping early and was finished by Thanksgiving.  Even the packages are wrapped.  Today, I put up and decorated my parents tree as well as our own.  The outside of our home is decorated, so I am in pretty good shape as far as getting a jump on things.  I am hoping to devote the next couple of weeks to some fun Christmas crafting and baking.

Today, I have one last fall-themed card that I made for a dear friend for Thanksgiving.  She was kind enough to send me this My Besties stamp recently, so I couldn't wait to use it.


The image was colored with Copic markers and highlighted with a bit of Stickles.  The papers are from Graphic 45's "An Eerie Tale" collection.  The fancy opening around the stamp was made with a Go Kreate die.  I used a cream Viva pearl pen to edge the opening; however, it is too light to show up well.  A darker pearl shade would have been better.  Anyway, I finished it off with some Prima flowers and a PTI sentiment.


I love the sweet images from My Besties.  I've put in a request to Santa for a couple more!  lol  It was fun using my Copics again.  I find it very relaxing.

Thank you so much for taking the time to stop by and for any comments you leave.  I hope the week ahead is wonderful for you.

Sunday, November 23, 2014

Card and Matchbox

Hi friends!  I hope everyone had a wonderful weekend.  I know the weather has been crazy in some areas of the country.  We've had a chilly week; however, tomorrow's temperature is expected to soar to near 75 but, by Wednesday, there is a chance for a snow/rain event just in time for Thanksgiving!

A dear friend recently celebrated her birthday so I made a card and matchbox set for her.  The matchbox is a first for me and was so easy to make.


The card base was made with kraft cardstock and a sheet of K&Co paper.  The doily is Wilton.  The diecuts are all from Kaisercraft, and the green flower is Petaloo.  I added a few rhinestones and a pebble from Recollections.  Foam dots were added here and there for dimension.


The matchbox was made using a Tim Holtz die and made to match the card using the same products.


The stamped sentiment on the tag is from Paper Salon.  Below is an image of the box opened.


I decorated the inside of the box with more diecuts from Kaisercraft.  It can be filled with tiny goodies or even a small dimensional decoration.  I have a lot of plans using this die for Christmas gifts.


Have you started making Christmas gifts yet?  I just finished five tags for a Christmas swap, so now I can devote the next few weeks to making some cards and a few of these matchboxes.  It's hard to believe there is only about one month to go!

Thanks so much for taking the time to visit here and the sweet comments you leave.  Have a wonderful week and, for those celebrating, Happy Thanksgiving!

Sunday, November 16, 2014

Two More Christmas ATCs

Hi everyone!  I hope you have had a good weekend.  I actually got most of my Christmas shopping done and just need to get some gift cards and a few odds and ends.  With Thanksgiving being late this year, I wanted to get the shopping out of the way so I can enjoy the weeks leading up to Christmas.

Today, I'm sharing the last two ATCs I made for a recent swap.  They were both really very easy to make.


The papers on this first ATC are from MME.  In the center is a layered sticker.  The buttons are from my stash.


Next up is an ATC using an old line of MME glittered paper which is difficult to see in this photo.  I simply added a snowflake sticker with a Recollections reindeer on top to the center.  Rhinestones were placed in the centers of the silver stars for some sparkle.  A felt snowflake strip was placed across the bottom.

The backs of the ATCs were also decorated a bit, but I forgot to photograph them.  They coordinated with the front and just had information about the card on it.  Here are all four together.


Well, that's it for me today.  I am working on a Christmas tag swap now and need to create five tags by December 1.  I have four done that just need to have ties put on them and one more to go.  With Thanksgiving fast approaching, I hope to have them finished by the end of this week.

Have a wonderful week and thanks so much for stopping by and leaving your sweet comments.