Sunday, December 27, 2015

Peace

Christmas has come and gone already, and now the new year is anticipated.  We didn't have a white Christmas this year; instead, we had record warm temperatures (75 degrees Fahrenheit) as well as high humidity.  Not my idea of Christmas weather.  If we can't have snow, it should at least be cold!

Somehow, I never seem to start making Christmas cards in enough time.  The week before Christmas, I received a beautiful handmade card and some crafting goodies from my sweet blogging friend, Sharon.  Among the items she sent was a Peace die.  What perfect timing this was!  I knew immediately that I would make several cards featuring this word die.  Here are some of the cards I made.


Last week, I shared cards I made using the Tim Holtz Tattered Poinsettia die.  I received the matching embossing folders in the mail just before Christmas, so I was able to emboss the poinsettia leaves.  I highlighted them with Inka Gold and some Recollections gold beads.  I used some gold Stickles on the word Peace.  Another friend, ReNae, was kind enough to send me some cardstock embossed with the poinsettia pattern which I used on the background.


Here is the poinsettia cut and embossed on pattern paper with the edges inked in brown and the veins highlighted in Inka Gold.  Martha Stewart rhinestones were used in the center.


Both cards are shown side by side so you can see the subtle differences in the two.


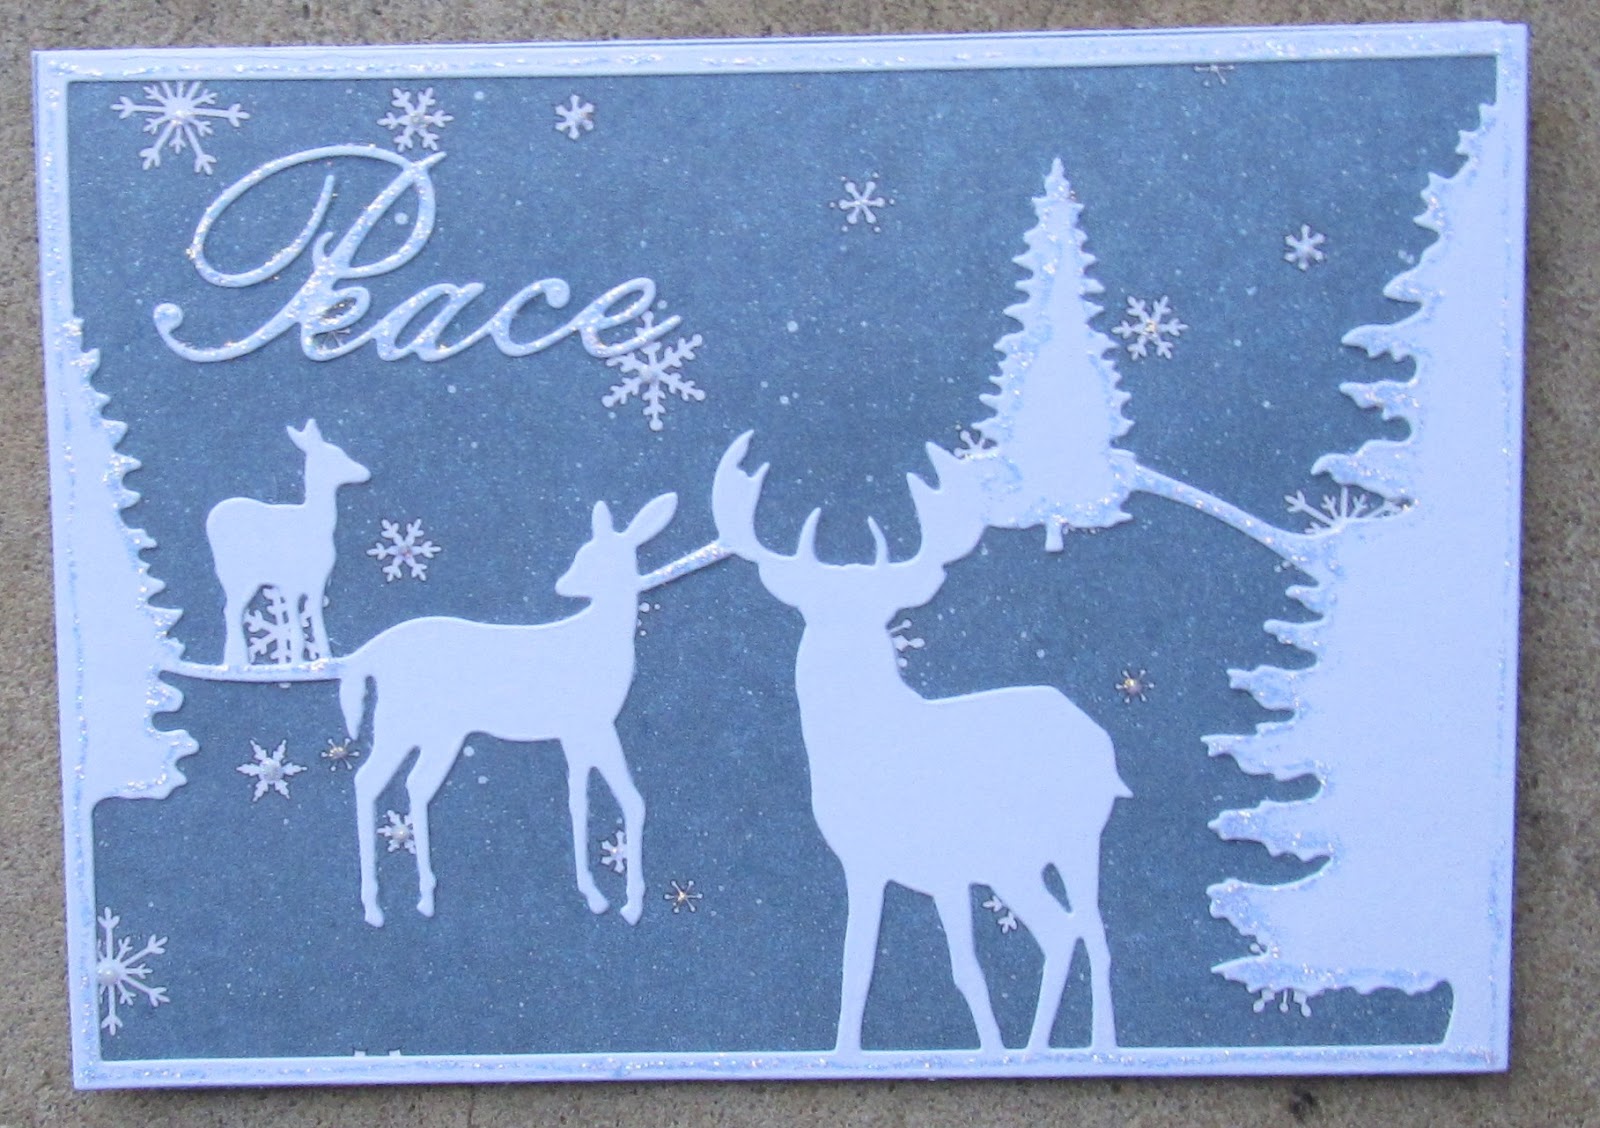
The scene on this card was made with a Sizzix die and adhered to snowflake pattern paper.  I used some diamond Stickles to highlight the edges.


Last, but not least, is a card similar to the ones I shared in my previous post.  The background paper is from the same My Mind's Eye collection I used in those cards (love those papers).  The wreath die is Memory Box, the fern branches are Tim Holtz, and the pearls are Recollections.

As you can see, I was able to use the Peace die quite a bit and am looking forward to more projects with it.  I spent some time just cutting out a lot of shapes with different dies which made assembling the cards much easier than doing one by one.

Thank you for reading through this rather long post!  I want to take the time to wish everyone a very Happy New Year filled with good health and happiness.  I appreciate your visits to my blog and the sweet comments you leave.

Sunday, December 20, 2015

Poinsettia Cards

I have been working on trying to make a number of Christmas cards in a short amount of time.  It would have helped if I had started the process earlier!  My goal for next year is to make at least one Christmas card a month in an effort to avoid making them in a rush come December.

The cards I'm sharing today both use the Tim Holtz Tattered Poinsettia die and the Catalina Wreath die by Memory Box.  The word "noel" is a Tim Holtz die, and the leaves were made with a Prima die.  I simply added glitter to all the diecuts.  Stamens were used for the centers of the poinsettias.  Background papers are from an older line of My Mind's Eye (I love this glittered stack).  Pearls are by Recollections.


I did try to mark veins onto the poinsettia petals but it doesn't really show up once the glitter was added.


For the second card, I simply changed the background paper and added snowflakes instead of the pearls.  I also inked the edges of each diecut to give them a more aged look.


If you click on each photo, you can see the details a bit better.


Here are both cards side by side so you can see the difference.  I really enjoyed making these cards.  It was a fairly easy process.


I found out there was an embossing folder made for the poinsettia die.  I tracked it down at Sizzix, and it arrived Friday evening.  Needless to say, I cut out a few more poinsettias and embossed them.  I'll share those in the next post.

Well, dear blog followers, in case I don't get a chance to post again this week, I want to wish all who celebrate a Merry Christmas.  Thank you so much for taking the time to stop by.  I appreciate your kind comments.

Sunday, December 13, 2015

Christmas Tag and Flat Cards for Mailing

Hi friends!  Is everyone ready for the holidays or getting a bit frantic like me in squeezing in enough time to make cards and everything else?  I always promise myself to start earlier to avoid the last minute crunch, but it never seems to work that way.  I think my New Year's resolution will be to make one Christmas card a month so I at least have some on hand.

First up today is a Christmas tag that I needed to put together quickly to get in the mail last week.  I began with a premade Martha Stewart tag and just embellished it.


All things used have been sitting in my stash for quite awhile.  The Noel stickers are from Jolee's, the rosette is from K&Co, and the star and rhinestones are from Michael's.  I used some red Stickles on the holly berries and added some ribbon and baker's twine to the top.


Next up are two cards that I needed to be flat enough for mailing internationally to cut down on the cost.  Both cards use a beautiful Sizzix die sentiment as the focal point.  The first card is made from an older line of K&Co glittered papers.  The snowflake stickers are Jolee's and the bird sticker is K&Co.  A piece of lace trim and Recollections silver and white twine finishes it off.


The last card was made with paper from The Paper Studio's Old World Winter line (love it).  I just added some red trim, rhinestones and stars as accents.


These two cards really came together quickly and were good for mailing without being bulky.  I do, however, love more dimension and frills on my cards!

Well, I better get back to crafting.  Time is running out!  I've been working on diecuts and glitter this weekend and having so much fun.  Thank you so much for stopping by at this busy time of year.  I appreciate the nice comments you leave.  Have a wonderful week ahead!

Sunday, December 6, 2015

Glistening Season Tag

Hi friends!  Have you noticed how much I love Pion Design papers?  Today, I have a tag to share using paper from their Glistening Season collection.


Using a premade kraft tag, I adhered a piece of the paper to it.  I love the winter church and deer scene, so I brought attention to it by placing a chipboard postage stamp frame that I glittered around it.  I tucked in another piece of pattern paper behind the frame and cut a border sentiment to place at the bottom.  A piece of lace accented with a twine bow and Maya Road bauble was added to the bottom.  I used a couple of Martha Stewart punches for the snowflakes and added rhinestones from Recollections.  A piece of twill finished the top.


And there you have it.  Very easy to make.  If you click on each image, you can see the details better.  I have been using this line to make quite a few tags.

Well, that's it for me today.  I really appreciate your kind comments and thank you so much for stopping by.  Have a wonderful week ahead!

Sunday, November 29, 2015

Santa Tag

Hi dear friends!  For those that celebrated Thanksgiving this past week, I hope it was wonderful.  Now is time to forge ahead with Christmas preparations.  I know a lot of people have already started.  I had planned to make things well beforehand but never did accomplish much.  So, crunch time begins for me!

A few weeks ago, I was off to a good start and made a tag using papers once again from the beautiful Pion Design.  This one features a vintage Santa image.


The base of the tag was covered with a pretty piece of paper and a border strip.  I layered the sweet Santa image onto red cardstock, tucked some cheesecloth underneath and attached it to the tag with foam squares.  A bit of red trim was adhered to the bottom of the tag.  Various snowflakes were made with Martha Stewart punches and K&Co gems attached to them.  The one snowflake has a pretty satin flower attached to it.  Some red seam binding and ribbon was placed at the top.


If you click on each image, you can see the details better.  I really love this Pion paper collection.  There are so many beautiful images to choose from.

Now, it's time for me to decorate the Christmas tree.  My husband and I got most of the decorations up outside with just a couple of things to finish there.  It's a lot of work but so rewarding when everything is done.  Thanks so much for taking time to stop and visit my blog and for the kind comments you leave.  I hope the week ahead is a wonderful one for you.

Sunday, November 22, 2015

Vintage Garden Card

Hi there, friends!  It is a chilly, windy day today but I love it!  This past week, I accomplished a lot around the house that I had been putting off doing and even managed to squeeze in a bit of crafting.  Christmas will be here soon and, I'm afraid to say, I do not have any cards made.  I did do one for a swap but I need to build up my personal supply.

Today, I have a card to share using the always beautiful Pion Design papers.  The sweet image is from the Vintage Garden collection.


I began by inking the edges of a cream card base.  Next came the pretty pattern paper.  A piece of crochet trim was glued to the paper. The image was adhered to a piece of corrugated cardstock by DCWV which I highlighted with Picket Fence Distress Paint.  The Memory Box Catalina wreath was given a coat of glitter.  Recollections flowers were then attached to it as well as a hemp bow.  The sentiment was cut from one of the sheets of paper.


I absolutely love Pion Design papers.  The papers are so beautifully vintage!  A friend recently sent me their Christmas papers which I immediately made a tag.  Looking forward to making some cards with them as well.

That's about it for me today.  Enjoy the rest of your weekend.  Happy Thanksgiving to those celebrating this Thursday.  Thank you for taking the time to stop by and for your kind comments.

Sunday, November 15, 2015

Mixed Media Tag

Hi friends.  Let me just say, my thoughts and prayers are with the people in France as they try to deal with the tragic events in Paris this past week.  What a frightening world we live in today!

A couple of weeks ago, I decided to pull out various inks, sprays and pastes to make a couple of tags.  Here is one I created.


The base is a premade black tag that was covered with a sheet of patterned paper.  I then took a Tim Holtz stencil and modeling paste to give texture to the background.  I sprayed several Glimmer Mists onto the tag.  I neglected to keep track of the sprays used as I just kept spraying various ones until I achieved a look I was happy with.  A piece of decorative trim was added to the bottom.  Some of the flowers are from Recollections and the leaves are Prima.  I added a pick from Petaloo and a charm from my stash.  The butterfly image is from Crafty Secrets and showcased with a K&Co frame.  A few rhinestones from Recollections and a seam binding bow finishes the tag.


I think the colors are perfect for this time of year.  There is so much shimmer and shine to the tag in person.

That's it for me today.  Earlier, I helped my parents make homemade kielbasa--a Polish family tradition with us--so I am looking forward to relaxing the rest of the day (hopefully).  Thank you so much for stopping by.  I always enjoy and appreciate reading your kind comments.  Have a wonderful week!

Sunday, November 8, 2015

Vintage Glam Tag

Hi dear friends!  It is a glorious fall day today--loving the fresh air!  We did have some warm, humid days this past week, but today is just fabulous--sunny, crisp and breezy.

Today, I have a tag to share using Recollections Vintage Glam line.  The collection is perfect for any time of year but especially for the fall.  I love the kraft papers mixed with silver and gold glittered designs.


Using a tag made from a cereal box as a base, I covered both sides with cardstock that had a lace design on it.  A Wilton gold doily was cut in half and place behind a Tim Holtz Found Relatives image.  I also tucked in some scraps of papers from my stash.  A burlap tag with gold circles from the Vintage Glam line was also placed behind the image.  A gold/white piece of twine also from the collection was tied onto the burlap tag.  Aren't the flowers and leaves pretty?  Those as well as the lace at the bottom are from the collection.  The metal Memories embellishment, I believe, is Recollections.  A piece of twill, twine and vintage buttons add the finishing touch.


Well, that's all for me today.  I plan to enjoy this beautiful Sunday.  I hope you have a wonderful day and week ahead.  Thank you so much for stopping by.  I appreciate all your sweet comments.

Sunday, November 1, 2015

Winter Doll Tag

Happy November!  Where did October go?  I love the fall and winter months and want to enjoy every moment of them.  I always seem to have more energy this time of year.  I think I have the opposite of the seasonal disorder that afflicts a lot of people during the winter months as I seem to get it in the summer months.

It is time to start getting ready for the holidays so I hope I won't be too far behind on the card and tag making as the time draws nearer.  Today, I have a winter tag to share featuring a Julie Nutting doll stamp.


I began with a manila tag base and inked the edges.  I don't remember what pattern paper I used as I made this tag a couple of months ago and forgot to write it down.  The snowflakes are stickers from K&Co as well as Martha Stewart.  The doll was stamped onto watercolor paper, colored with Copics, and adhered to the tag with foam dots.  Her dress and hat were paper pieced.  I used Glossy Accents to give some shine to the fur trim of the hat, the bow, and the boots.  A bit of trim was added to the bottom of the tag and a piece of ribbon to the top.


This was my first tag for the holidays and I have since made two more.  I really need to start making some holiday cards now so I don't fall behind.  I never seem to allow myself enough time!

That's it for me today.  We gained an extra hour of sleep last night in setting the clocks back and that was a wonderful thing!  Thank you so much for stopping by and for your sweet comments.  Have a fantastic week!

Sunday, October 25, 2015

Tag Within a Tag

Hi friends!  It's a so-so day here--overcast.  I'm making a small turkey breast for dinner today; so before I begin that, I thought I'd pop in for my weekly blog post.

Today's tag within a tag was made with the new Vintage Glam collection from Recollections.  Love the kraft color mixed with doilies and sparkles.


The tag was cut from a cereal box to give it extra support and then both sides were covered with Vintage Glam papers.  I made a pocket on the front from another sheet and edged the top of it with glittered trim.  I placed a Wilton doily onto the tag and a pretty rose button from Tim Holtz at the top.  A cluster of Recollection flowers highlighted with Inka Gold and a glittered twine bow was placed in the lower right corner.


The smaller tag is a premade burlap tag from the collection.  I simply decorated it with a burlap and linen flower and gold-tipped leaves (also part of the collection).  A piece of lace trim was placed at the top.  I forgot to photograph the back, but it was covered with a sheet of diagonal silver glittered stripe paper.


This is really quite a pretty collection.  Of course, I am drawn to anything that sparkles!  I've made several projects with this collection so far.


Before I sign off today, I thought I'd share a photo from our annual Fall visit to a local orchard last week with my dear sister-in-law Anabelle and her son.  Unfortunately, my son hadn't arrived yet, so he isn't in this photo.  Thank you so much for stopping by and all the kind comments you leave.  I wish everyone a wonderful week!

Sunday, October 18, 2015

Quick Tag

Hi everyone!  It's been a beautiful fall weekend here.  We visited our local orchard with my sister-in-law and nephew--a fall tradition we've been doing for 13 years now.  It's always nice to look back on the photos of each year.

Today, I have a very quick and easy tag to share.  I started with a pre-made manila tag base and covered it with Prima's Printery paper.  The flower and brad are from Prima's Engraver collection.  The butterfly and rhinestones are from Recollections.  The sentiment was cut from black cardstock using a Tim Holtz thinlit die.


This tag came together in no time at all!  The colors are perfect for the fall season.  And, of course, I love Prima!


Thank you so much for taking the time to stop by and your kind comments.  Wishing you a wonderful week ahead!

Sunday, October 11, 2015

30th Birthday Card

Hi there, everyone!  We are enjoying some beautiful fall weather here.  I had a chance to spend some time in Amish Country the other day--picked up some farm fresh produce, pumpkins and a mum.

My card today was made for a co-worker's recent 30th birthday.  On a white cardstock base, I inked and layered various papers from Prima's Butterfly collection.  The precut doily is from Martha Stewart.  The glittered rose is Prima and the other flowers and leaves are Recollections.  The chipboard flower and butterfly are part of the paper collection.  A twine bow and tag with gold sticker from Making Memories were tucked into the flower cluster.  The rhinestones were in my stash.


The card came together very quickly.  It usually takes me over three hours to make a card--sometimes even working on it the following day.


Well, it's early enough here that most of the day is still ahead of me so I intend to go out and enjoy this beautiful weather.  Thank you so much for stopping by.  I always appreciate the kind comments you leave.  Have a wonderful week!

Sunday, October 4, 2015

Once Upon a Time Tag

Hi everyone!  It's been a windy, raw weekend here; but thank goodness, we missed the hurricane--just dealing with a nor'easter.  With World Cardmaking Day yesterday, it was a good weekend to spend indoors crafting.  I did make a card but have to put the finishing details on it.

Halloween is just around the corner, so I pulled out my Graphic 45 "An Eerie Tale" papers and made a tag.  I think this tag fits a storybook theme more than Halloween.  What do you think?


I began with a tag base cut from a box of cereal and adhered papers to both sides.  The doily was a gift and almost looks like a spiderweb.  I then layered a diecut from another sheet of paper, a Martha Stewart doily and a Graphic 45 chipboard tag.  All the edges were inked in Tea Dye and Black Soot.  The flowers, leaves and rhinestones are from Recollections.  If you click on the photo, you can get a better look at the delicately glittered leaves.  A piece of black lace from Making Memories was attached to the bottom, and an orange ribbon with purple tinsel tied to the top.


I made another tag for Halloween but only took photos on my phone.  Not being tech savvy, I need to figure out how to upload them to the computer.  lol

Well, that's it for today.  I appreciate you stopping by.  Thank you very much for the sweet comments left on my blog last week.  Have a wonderful week ahead!

Sunday, September 27, 2015

To a Very Special Friend

Hi everyone!  I hope you are well.  Today, I am prepping for a colonoscopy tomorrow so am doing things to take my mind off it!  Can only have liquids and jello.  I figure if I spend most of the time crafting, it will keep my mind off food.

My card today was made with the beautiful Pion Design papers, A Day in May.  I love these papers!


I began by adhering a couple sheets of the patterned paper to a cream cardstock base and inking the edges.  Isn't the image pretty?  A Memory Box diecut, Catalina Wreath, was given a coat of Martha Stewart glitter and placed to frame the image.   Recollections self-adhesive lace and flowers were then added.  The sentiment was cut from the papers as was the butterfly.  A vintage button and seam binding were added to the upper right corner.


Well, I guess I'll have my lunch of chicken broth and tea and then decide what to craft.  I made a tag from these papers yesterday, so maybe I'll make a few more.  I am doing a tag swap which is running until January.  Thank you so much for your sweet comments and taking the time to stop by.  Have a wonderful week!

Sunday, September 20, 2015

TH Butterfly Tag

Hi everyone!  I am enjoying this time of year as we transition into the fall season.  I love that little nip in the air and having the windows open for the fresh air to circulate through the house.  Looking forward to all the sights and smells of this beautiful season!  While I am sure we will still have a few days of summer-like weather here and there, I am so ready to enjoy the fall.

Today, I have another tag to share that is totally inspired by Tim Holtz and his products.  The black tag base is from Ranger.  I adhered a piece of patterned paper from Tim's Correspondence collection and inked the edges with a touch of Black Soot.  A few remnant rubs were added to the upper left and lower right corners.  Using a butterfly cut from the Butterfly Duo set, I inked it in various shades of Distress Ink.  Unfortunately, I did not keep a list of the shades used; but I do know that Squeezed Lemonade, Victorian Velvet and Black Soot were used.  A coat of Perfect Pearls Heirloom Gold spray adds sparkle to the butterfly.   I also used the same shades of Distress Ink mixed with a little water to color the ribbon.  After tying the bow, I attached a pin and word charm (highlighted with Picket Fence paint) to the bow.  A few little vintage envelopes cut from the Correspondence paper were tucked behind the bow.  An idea-ology reinforcer and black paper string were placed at the hole in the top of the tag.


This tag was so much fun to make.  I really enjoyed trying the various inks on the butterfly.  I diecut a few more butterflies and am anxious to make them in other color combinations.


Thank you so much for taking the time to stop by.  I appreciate each comment left.  Have a wonderful week ahead!

Sunday, September 13, 2015

Stamps Be Gone Challenge

Hi everyone!  I don't often participate in challenges, but I couldn't miss the current challenge at the Frilly and Funkie blog.  You are to create a project without using stamps and this is what I made.


I began by adhering a sheet of K&Co paper to a manila tag.  The edges were distressed and stained with Tea Dye Distress Ink.  A paper doily was also inked and placed under the Tim Holtz Found Relatives photo.  I used Distress Markers to add a bit of color to the girl's corsage.  Using a Tim Holtz branch die highlighted with Stickles, I attached the branch to the side and bottom of the photo.  The resin and paper flowers are from Recollections and the tiny roses are Petaloo.  Each were given a bit of Distress Ink for accent.  A couple of vintage pearl buttons were placed in the flower cluster.  The crochet doily under the one flower is from Colorbok.  The brass charm under the resin flower was a gift to me.  Tiny pearls also from Recollections were added at the top and side of the photo.  A bit of lace was added to the bottom of the tag and a piece of tulle to the top as a finishing touch.


If you love vintage, do stop over at the Frilly and Funkie blog.  There is a lot of inspiration to be found there!

Well, that's it for me today.  We have a beautiful fall-like day this Sunday, so I plan to go out and enjoy it.  Have a wonderful week!  Thanks so much for taking the time to stop by and for all your kind comments.


Sunday, September 6, 2015

A Day in May Card

Hi everyone!  Yes, I know summer is just about over and fall is fast approaching; but my post today is called A Day in May because I used that beautiful paper collection of the same name from Pion Design.


I simply love the shabby, vintage look of these papers!  I started with a cream cardstock base and adhered a couple of the patterns to the base.  One sheet was a page of border strips, so I cut one out to cover where I joined the two edges.  All papers were inked with Tea Dye Distress Ink.  The lace edge is from Recollections.  I added glitter to a postage stamp frame to showcase one of the pretty images in the collection.  The flourish in two corners is from Crafty Secrets and stamped in Vintage Sepia.  A Recollections pebble was added to the Colorbok doily which is surrounded with Recollections flowers.  The sentiment was also cut from the border strip sheet.  The butterfly was cut from another sheet.  I finished the card by added a hemp bow to the flower cluster and a seam binding bow with a vintage button to the opposite corner.


I was so hesitant to cut into this paper as I just love it, but I've come to the conclusion you can't save everything!  I also made another card that I'll share later.

Thank you so much for taking the time to stop by and your sweet comments.  I am happy to see I have a couple of new followers and want to say "Welcome" and thank you.  I wish a wonderful week ahead for everyone!  Happy Labor Day weekend to those in the States celebrating--enjoy the long weekend!

Sunday, August 30, 2015

Prima Doll Tag

Hi everyone!  Well, summer is almost at an end and I am seeing hints of fall here and there.  I love the fall season with the warm, cozy feelings it brings.  It's been a bit stressful lately for me but I am trying to look on the bright side.  One thing that always makes me happy is my craft time each week.  I find it a most relaxing time when I make something.

Today, I have another tag to share featuring a Julie Nutting doll stamp.  At the time, she was the only doll stamp I had but I've since acquired a couple more and can't wait to use them.


For the background of the tag, I used Prima's Butterfly collection paper and a Heidi Swapp heart stencil.  I added a bit of glitter to the hearts to give them sparkle.  The doll was colored with Copics and her outfit was paper pieced.  I added some rhinestones to her dress and a bit of glitter to her slip.  The butterfly wings are from Recollections.  Once again, I used an older Prima vine which I glued to the left side.  The little wooden birds on the vine are from Recollections also.  I simply inked them up a bit.  The lace trim at the bottom, I think, is Prima.  A couple of butterflies were cut with a Martha Stewart punch, accented with rhinestones, and added to the upper right.


Here, you can see that I raised the doll up from the paper with some foam squares.  A bit of ribbon at the top finishes it off.

Well, that's about it for today.  Enjoy the rest of your weekend.  Thanks so much for stopping by and the sweet comments you leave.

Sunday, August 23, 2015

Vintage Tag

Hi everyone!  It's been a beautiful weekend here.  I hope you are enjoying some relaxing time.  I've been working on a lot of tags lately for a swap and have a new one to share today.


Once again, I used things I've been hoarding to make this tag.  The background paper is an older K&Co line that I inked the edges with Tea Dye Distress Ink.  The flowers,leaves and pearl swirls are Prima.  I believe the frame around the vintage image is from Tattered Angels, but I'm not sure.  I did give it a coat of glitter for sparkle.  The wooden clock and lace trim are Recollections.  The lace tie at the top was from the bargain bin at Joann's.


And there you have it.  Time to use up things instead of saving them.  Plus, it clears the way for new items!

Wishing you a wonderful week ahead.  Thanks so much for stopping by and your sweet comments.

Sunday, August 16, 2015

Meadow Lark Tag

Hi there, friends!  It's a wickedly hot/humid week coming up here and I am so thankful for air conditioning.  In my last post, I mentioned problems with the new Windows 10 we installed on the computer.  After trying several suggestions that did not work, we solved the problem by uninstalling Windows 10 and going back to Windows 7.  What a difference!  I guess it's true--if it isn't broke, don't fix it.

Recently, I was the recipient of a wonderful RAK that included papers from Prima's Meadow Lark collection.  They are so pretty, so I decided to make a tag with them.


Just about everything Prima was used for the tag.  The edge of this tag is a bit different in that I fussy cut the left side so that the flower hang off the edge.  I then inked the edges with Ingvild Bolme Vintage Pink chalk ink.  I highlighted some flower centers in the paper design with Stickles.  An assortment of pretty Prima flowers and leaves were placed in the lower right corner with a twine bow.  I placed a couple of Prima pearl clusters in the centers of some of the flowers.  A pearl and rhinestone swirl was added to the background.  A birdcage diecut from a friend that I touched up with a bit of Inka Gold was tucked into the flower cluster.  I then fussy cut and inked a bird from another sheet of paper and attached it to the tag with foam dots.  A tea-stained piece of ribbon from Melissa Phillips and a piece of lace were tied to the top of the tag.


That's about it for me today.  I'm staying indoors where it is cool and probably do some crafting (after I iron clothes and before I make dinner).  Thank you so much for stopping by and the kind comments you leave.  I hope the week ahead is wonderful for everyone.